Showing posts with label Report in C#. Show all posts

Tuesday, 24 February 2015

Sub Report in RDLC Report viewer

In this article I am going explain about sub report control of RDLC and how can we use sub report in RDLC and report viewer by taking a real life example in an asp.net application.

I have taken an example of Orders and its Line items. Our report will something look like this:


In order to achieve above screenshot in a browser, you can follow the steps given below:

1)      Open Microsoft Visual Studio

2)      Select Asp.Net Empty Web Application.

3)      Add a new item (Report.aspx)

4)      Drag and Drop ReportViewer control and ScriptManager from the toolbox.

<form id="form1" runat="server">

    <div>

        <asp:ScriptManager ID="ScriptManager1" runat="server">

        </asp:ScriptManager>

        <rsweb:ReportViewer ID="rptViewer" runat="server" Width="100%" Height="600px" Font-Names="Verdana"

            Font-Size="8pt" InteractiveDeviceInfos="(Collection)" WaitMessageFont-Names="Verdana"

            WaitMessageFont-Size="14pt">

        </rsweb:ReportViewer>

    </div>

</form>


Add the following Object and Business class in order to specify the data for reportviewer:

1)      Order.cs


public class Order

    {

        public long OrderNo { get; set; }

        public DateTime OrderDate { get; set; }

        public string Customer { get; set; }


        public List<OrderLine> Lines { get; set; }

    }


2)      OrderLine.cs

public class OrderLine

    {

        public long OrderNo { get; set; }

        public int LineNo { get; set; }

        public string Product { get; set; }

        public float UnitPrice { get; set; }

        public int Quantity { get; set; }

        public float VAT { get; set; }

        public float Discount { get; set; }

        public float Total { get; set; }

    }


3)      BLL.cs

public class BLL

    {

        public static List<Order> GetOrders()

        {

            return new List<Order>

                        {

                            new Order { OrderNo = 1, OrderDate = DateTime.Now.AddYears(-3), Customer = "A", Lines = new List<OrderLine>

                                        {

                                            new OrderLine { LineNo = 1, Product = "A", UnitPrice = 200, Quantity = 4, VAT = 10, Discount = 2, Total = (200*4) + (200*4*10/100) - (200*4*2/100) },

                                            new OrderLine { LineNo = 2, Product = "B", UnitPrice = 250, Quantity = 4, VAT = 5, Discount = 1, Total = (250*4) + (250*5*10/100) - (250*4*1/100) },

                                        } },

                            new Order { OrderNo = 2, OrderDate = DateTime.Now.AddYears(-2), Customer = "B", Lines = new List<OrderLine>

                                        {

                                            new OrderLine { LineNo = 1, Product = "A", UnitPrice = 200, Quantity = 4, VAT = 10, Discount = 2, Total = (200*4) + (200*4*10/100) - (200*4*2/100) },

                                            new OrderLine { LineNo = 2, Product = "B", UnitPrice = 250, Quantity = 4, VAT = 5, Discount = 1, Total = (250*4) + (250*5*10/100) - (250*4*1/100) },

                                        } },

                            new Order { OrderNo = 3, OrderDate = DateTime.Now.AddYears(-1), Customer = "C", Lines = new List<OrderLine>

                                        {

                                            new OrderLine { LineNo = 1, Product = "A", UnitPrice = 200, Quantity = 4, VAT = 10, Discount = 2, Total = (200*4) + (200*4*10/100) - (200*4*2/100) },

                                            new OrderLine { LineNo = 2, Product = "B", UnitPrice = 250, Quantity = 4, VAT = 5, Discount = 1, Total = (250*4) + (250*5*10/100) - (250*4*1/100) },

                                        } },

                        };

        }

    }


Create a Report folder in the root directory of your application and add two report (.rdlc) files in the same folder Report.rdlc and Report1.rdlc

Also add a Dataset in Report folder and create these two DataTable in the same dataset.

1)      Order (OrderNo: Int64, OrderDate: DateTime, Customer: String)

2)      Line (OrderNo: Int64, LineNo: Int32, Product: String, UnitPrice: Double, Quantity: Int32, VAT: Double, Discount: Double, Total: Double)

Configure Report.rdlc

1)      Now add an Order DataTable in Report.rdlc file and also drag and drop Table control from Toolbox and set the columns of DataTable in Table columns.

2)      Remove the header row from the table control.

3)      Add a parameter Total of type float in the Parameters folder.

4)      Drag and Drop Textbox control and set the Total parameter in the textbox.

5)      Right click on Table row and select Insert Row à select Inside Group – Below.

6)      Select all the columns of added row and right click and choose Merge Cells option.

7)      Now Drag and Drop Subreport control from toolbox in this row.

8)      Set the properties of Subreport.  

a.       ReportName: Report1

b.       Name: LineInfo

c.        Hidden: True

d.       ToggleItem: OrderNo

9)      Right Click on Subreport and add a parameter (OrderNo) to display the OrderNo wise LineInfo.
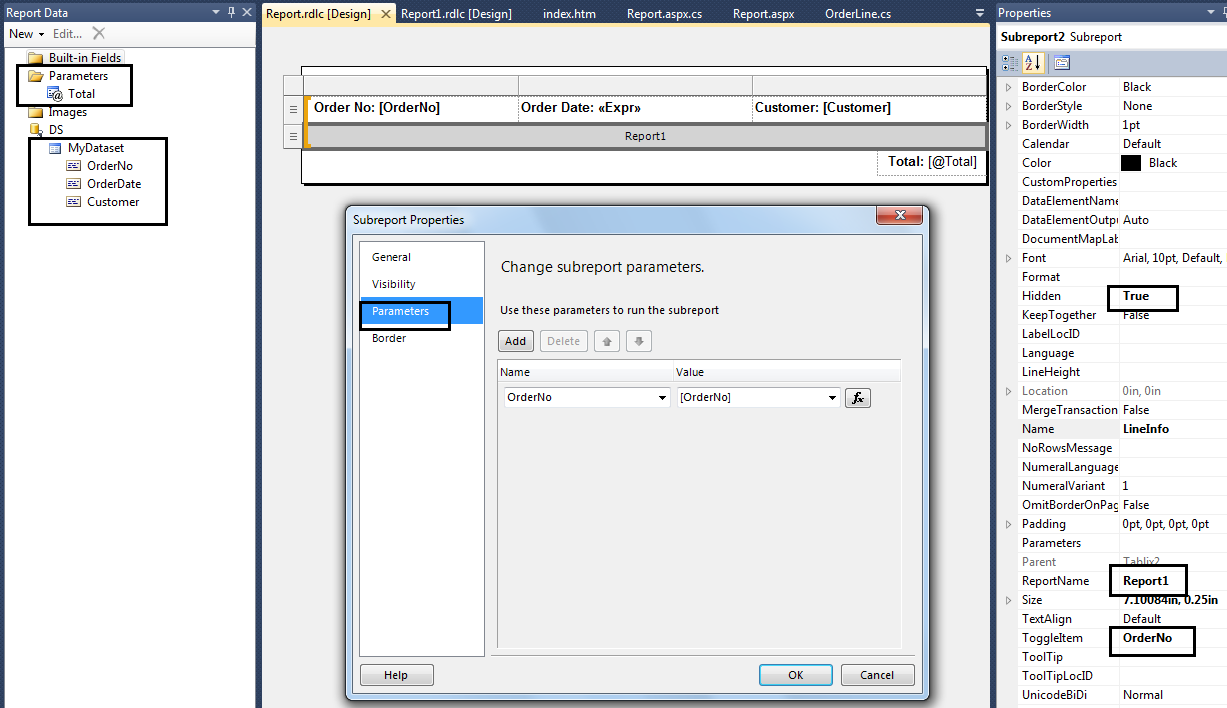
 

I also highlighted the configured part in the above screenshot for your reference. Please make sure all the steps should be properly configured.


Configure Report1.rdlc

1)      Now add a Line DataTable in Report1.rdlc file and also drag and drop Table control from Toolbox and set the columns of DataTable in Table columns.

2)      Select Row of the Table  à Select Details from Row Groups give at the bottom of the page àChoose Add Total option à Choose After.

3)      Remove all sum columns except Sum(Total) and merge all the cells in this row.

Our configuration part is completed now. Now we will move towards our server side code where we dynamically set the data in reportviewer control and its subreport.

Open Report.aspx.cs and add the following two functions:

1)      Page_Load

protected void Page_Load(object sender, EventArgs e)

        {

            if (!Page.IsPostBack)

            {

                string path = Path.Combine(Server.MapPath("~/Report"), "Report.rdlc");

                rptViewer.LocalReport.ReportPath = path;


                var cm = BLL.GetOrders();


                ReportParameter [] param = new ReportParameter[1];

                param[0] = new ReportParameter("Total", cm.Sum(m => m.Lines.Sum(x => x.Total)).ToString(), true);


                rptViewer.LocalReport.SetParameters(param);


                rptViewer.LocalReport.DataSources.Clear();

                ReportDataSource rd = new ReportDataSource("MyDataset", cm);

                rptViewer.LocalReport.DataSources.Add(rd);

                rptViewer.LocalReport.Refresh();


                rptViewer.LocalReport.SubreportProcessing +=

                    new Microsoft.Reporting.WebForms.SubreportProcessingEventHandler(LocalReport_SubreportProcessing);

            }

        }


2)      LocalReport_SubreportProcessing


void LocalReport_SubreportProcessing(

            object sender,

            Microsoft.Reporting.WebForms.SubreportProcessingEventArgs e)

        {

            // get empID from the parameters

            int iOrderNo = Convert.ToInt32(e.Parameters[0].Values[0]);


            // remove all previously attached Datasources, since we want to attach a

            // new one

            e.DataSources.Clear();


            // Retrieve employeeFamily list based on EmpID

            var lines = BLL.GetOrders().Single(m => m.OrderNo == iOrderNo).Lines;


            // add retrieved dataset or you can call it list to data source

            e.DataSources.Add(new Microsoft.Reporting.WebForms.ReportDataSource()

            {

                Name = "LineDS",

                Value = lines

            });

        }


Now all we set to see the output in browser window. Run an application and browse Report.aspx. I hope the output should be fine and we can the list orders and line items y expanding the rows.


Thanks for reading this article. I think this will helps a lot. You can ask any question and can also provide feedback for this article by using the comment box given below.

In order to see reportviewer basic you can visit this article Using ReportViewer in WinForms C#


Wednesday, 12 February 2014

Using ReportViewer in WinForms C#

In this article I am going to explain how to dynamically create a report by using report viewer in windows form. To view reports that exist on local file system, you can use the WinForms ReportViewer control to render them in a Windows application.

The following example demonstrates how to render a report using ReportViewer control.

To add the ReportViewer Control to a Windows application

·         Create a new Windows application using Microsoft Visual C#.

·         Locate the ReportViewer control in the Toolbox.

·         Drag the ReportViewer control onto the design surface of the Windows Form. A ReportViewer control named reportViewer1 is added to the form.

This example also uses the following class (Student) and its properties and methods to display the data in report. Please create or include the following class and its content in your application.

    public class Student

    {

        public int StudentID { get; set; }

        public string Name { get; set; }

        public DateTime DateofBirth { get; set; }

        public string Address { get; set; }

        public int Marks { get; set; }

    }


    public class StudentRepository

    {

        public static List<Student> GetStudents()

        {

            List<Student> list = new List<Student>

            {

                new Student

                {

                    StudentID = 1,

                    Name = "Rohit",

                    Address = "Uttar Pradesh, Allahabad",

                    Marks = 90,

                    DateofBirth = Convert.ToDateTime("4-Feb-1991")

                },

                new Student

                {

                    StudentID = 2,

                    Name = "Rahul",

                    Address = "Uttar Pradesh, Kanpur",

                    Marks = 85,

                    DateofBirth = Convert.ToDateTime("21-Oct-1991")

                },

                new Student

                {

                    StudentID = 3,

                    Name = "Rati",

                    Address = "Uttar Pradesh, Varanasi",

                    Marks = 80,

                    DateofBirth = Convert.ToDateTime("21-Dec-1991")

                },

                new Student

                {

                    StudentID = 4,

                    Name = "Shweta",

                    Address = "Uttar Pradesh, Allahabad",

                    Marks = 75,

                    DateofBirth = Convert.ToDateTime("21-Nov-1991")

                },

                new Student

                {

                    StudentID = 5,

                    Name = "Arun",

                    Address = "Uttar Pradesh, Lucknow",

                    Marks = 70,

                    DateofBirth = Convert.ToDateTime("3-Mar-1989")

                }

            };


            return list;

        }

    }


To add the Student details report to a Windows application

·         From the project menu, select Add New Item.

·         Select Report and edit the name and click the Add button. The StudentReport.rdlc file should now be part of the project.

In Data Source Configuration wizard choose a Data Source Type as Object.

In the next step, select Student class and click on Finish button.


·         Add a new dataset in StudentReport.rdlc page and name the dataset as StudentDS.

·         Choose Student from the Available dataset options.

·         Click on OK button to finish the step.

Insert a Table in the rdlc page as shown in the figure below:

Drag and drop the dataset fields into the inserted table columns.

To display the student data in the format of chart choose Insert -> Chart from the context menu as shown below:

Select chart type from variety of options given in the Select Chart Type dialog. Here I am choosing default chart type.

After adding a chart, do the following steps to display the student data in chart format:

·         Drag the Sum field from the dataset and drop it into the data field of Chart.

·         Drag the Name field from the dataset and drop it into the Category field of Chart.

·         Edit the X axis title to Name and Y axis title to Marks in order to make both the axis meaningful.


Now bind StudentReport.rdlc with the report viewer as shown below:

The following code example will render the Student report in report viewer.


        private void Form1_Load(object sender, EventArgs e)

        {

            List<Student> list = StudentRepository.GetStudents();  //get list of students


            reportViewer1.LocalReport.DataSources.Clear(); //clear report

            reportViewer1.LocalReport.ReportEmbeddedResource = "Student_ReportViewer.StudentReport.rdlc"; // bind reportviewer with .rdlc


            Microsoft.Reporting.WinForms.ReportDataSource dataset = new Microsoft.Reporting.WinForms.ReportDataSource("StudentDS", list); // set the datasource

            reportViewer1.LocalReport.DataSources.Add(dataset);

            dataset.Value = list;


            reportViewer1.LocalReport.Refresh();

            reportViewer1.RefreshReport(); // refresh report

        }


Now run or debug this application to see the output:

Thanks for reading this article. You can enter your valuable comments and suggestion to improve this article in the comment box.
In order to get the source code of this application, you can enter your valuable comment.